Wednesday, 5 November 2014

Work in Progress - Corsairs of Umbar (part 1)


Below are images of my current project, the Corsair Wars.  It will show you my army of Corsairs, as well as Dol Amroth and Fiefdoms. It is very much a 'work in progress', but is part of the latest Tale of X painters on the one-ring website.

Converted Corsair Reavers and Arbelestors

Corsair Spear/Pikes and bow men (command at the rear)

Test bases for the whole army - wooden decking


Look out for the links to the armies for the full list of players and contributors to the armies of Middle Earth:

 Mid Sussex War Gaming Club.


WotR SBG - Round 5 battle for Harondor - Gondor v Harad

As part of the Mid Sussex Wargaming clubs ongoing Lord of the Rings campaign my Harad army in West Harondor is under attack from James’s army moving south from Osgiliath. My Harad forces have been making significant inroads into Gondor’s lands and this battle is part of the Gondorian fight back.

James has 750 pts of Gondor against my 1000 pts of Harad. As defender I could have one major terrain piece or two minor terrain pieces to set up on my side of the battlefield. So I chose two minor terrain pieces which consisted of four broken walls. James had one minor terrain piece so he set up two broken walls his side.


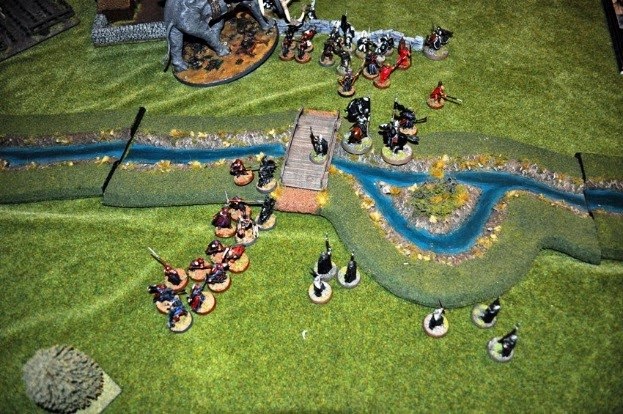
We faced each other across a small stream, which is difficult terrain for infantry, but has no effect on cavalry or monstrous mounts. He had a farmstead and field his side of the stream and I had a small hill my side of the stream. He set up behind his walls. His force consisted of King Ellesar leading six Knights of Minas Tirith, one with a banner, on my right flank. This was supported by six Citadel Guards. In the centre he had Damrod with twelve Rangers with spears as well as bows. On my left flank he had ten Guards of the Fountain Court and two Warriors of Minas Tirith, led by a Captain.
 
 
I set up with a Mumakil in the centre with twelve Warriors of Karna with bows in the Howdah. On my left flank I placed my leader, a Hasharin with one Half Troll, two Castellans of Umbar, three Watchers of Karna and five Haradrim Warriors with spear.
On my right I set up an Haradrim Chieftain leading one Half Troll, one Castellans of Umbar, five Watchers of Karna and four Haradrim Warriors with spear. This was supported by a Taskmaster with six Mahud warriors with spear, four Serpent Riders and two Mahud camel Raiders.


James sent King Ellesar wide to my right flank with his Guard of the Fountain Court moving wide to my left flank.


His rangers advanced in the centre. I made the decision to try to hold up King Ellesar while moving to attack the Guard of the Fountain Court. So I sent my cavalry off to intercept King Ellesar, who was using his free Might a turn to Heroic March.
 
As I suspected this was only partially successful, I managed to cut down two horses and one Knight, but then King Ellesar and the remainder of the Knights very quickly destroyed most of my cavalry. Although it took up a good portion of King Ellesar’s Might to do it. He had to Heroic Move and Heroic Fight.


In the centre I had some early success with my bowmen, killing five Rangers. But, then the dice turned against me, especially when I switched target to try to kill the Captain leading the Guard of the Fountain Court. For the whole of the rest of the battle my bowmen only got one more kill, which was a Guard of the Fountain Court. At the same time his Rangers managed to kill my Mumakil Chieftain, leaving it with no Might.


As I advanced on my left flank he withdrew behind his walls. My Haradrim Chieftain managed three heroic Marches with no Might loss due to the Taskmaster, which was very good for me. It meant I got into battle with the Rangers and Guards before King Elleasar could get to me.


My lines hit his Rangers first, which slowed my advance down; it took three turn to finally fight through them. I realised it had been a mistake to switch bow fire from them to the Guards. By the time I got to the Guards of the Fountain Court King Ellesar was coming up behind me. He went on alone as I intercepted the remainder of his Knights and Citadel Guard with my Hasharin warband and some Watchers of Karna. His troops were slowly cut down and at the end were wiped out.


As my Mumakil had lost its Chieftain his Guard of the Fountain Court were able to Heroic Move and attack my Mumakil before I could trample them, in fact I did not get in a single trample the whole game. Over two turns they inflicted two wounds on the Mumakil, but by a miracle my Warrior now in the top of the Howdah managed to succeed both times on his courage check, throwing 8 and 11 respectively. By which time my Chieftain and Taskmaster were slowly taking down the Guard of the Fountain Court. The Taskmaster even managing to take one down with his whip!

However, then King Ellesar arrived and after being repelled by a shielding Mahud got around onto the Mumakil.


King Ellesar and some Guards wounded the Mumakil again and this time it failed its courage. James then turned it against me trampling some of my Haradrim Warriors, it was stopped when it only managed to wound my Taskmaster twice, and he saved a wound with his fate which saved at least five other of my troops.


The Mumakil was now becoming a serious liability. Fortunately the rest of his force was mostly decimated and James decided to withdraw so that I could not get to kill King Ellesar.


If I had it might have taken him out of the campaign as he would have had to go to the House of Healing and a bad roll could be serious.

So I held West Harondor, it was a good fight, very enjoyable for me, as had I lost then my Harad territories open up for him to attack into. Now my Harad forces march on.


Tuesday, 4 November 2014

WotR SBG - Turn 5 Battle Results

At the end of round 5 the following battles were resolved - here are the results:

  1. Arnor vs Isengard (Isengard Withdrew)
  2. Rohan vs Isebgard (Isengard lost)
  3. Angmar vs Gladhrim (Angmar withdrew)
  4. High Elves vs Moria (Moria lost)
  5. Harad vs Gondor x2 (Gondor lost)
  6. Mordor vs Dwarves (Mordor Withdrew)
  7. Eastern Kingdoms vs Dwarves (Eastern Kingdoms lost)
  8. Eastern Kingdoms vs Dwarf non army (Dwarves lost)
Now on to ROUND 5!!!


Good:

Arnor & Shire
Rivendell & Grey Havens
Rohan & Wanders in Wild
Dwarves/Army of Thror
Gondor & Fiefdoms
Lothlorien & Mirkwood
1700
1750
2200
1300
1050
1450

Evil:

Mordor
Moria & Goblin Town
Azogs Hunters & Angmar
Harad and Umbar
Easterlings & Khand
Isengard & Dunland
2050
1600
1050
2050
1350
600

Middle Earth Campaign at end of round 5

Thursday, 11 September 2014

WotR SBG - Turn 5 Moves

These are the moves for turn 5

MOVE 1
1. Mordor
Vale of Celduin to vale of Carnen (attacking dwarves)
2. Gondor & Fiefdoms
Osgilith to Western Harondor (attacking Harad)
3. Rivendel & Lindon
Rivindell to Troll-shaws 
4. Durins Folk & Army of Thror
south dorwinion to vale of carnen
5. Isengard & Dunland
Remain in Isenguard
6. Moria & Goblin Town
Dol Guldur to Narrows of the Forest
7. Easterlings & Khand
Southern Dorwinion to Northern Dorwinion
8. Harad and Umbar
Harad will defend West Harondor
9.  Lothlorien & Mirkwood
Carrock to Eagles Erie
10. Arnor & Shire
Arnor to the weathered hills
11. Rohan & Wanders in the Wild
Gap of Rohan to South Dunland

12. Azogs Hunters, Gundbad & Angmar
Angmar to Mount Gundabad

MOVE 2
1. Mordor
South ithilien to north ithilien
2. Gondor & Fiefdoms
Lamedon to Pelegir
3. Rivendel & Lindon
tower hills to south ered luin
4. Durins Folk & Army of Thror
Attacked
5. Isengard & Dunland
Dunland to Hollin
6. Moria & Goblin Town
Attacked
7. Easterlings & Khand
Northern Rhun to Iron Hills
8. Harad and Umbar
Minas Tirith to Pelegir
9.  Lothlorien & Mirkwood
to Old Ford
10. Arnor & Shire
Shire into north dunland
11. Rohan & Wanders in the Wild
Westemnet to Fangorn
12. Azogs Hunters, Gundbad & Angmar
Withdraw from attack.
 
At the end of round 5 the following battles need to be resolved:

  1. Mordor vs Dwarves in Vale of Carnen
  2. Dwarves vs Eastern Kindoms for Iron Hills
  3. High Elves vs Moria (in Troll Shaw)
  4. Harad vs Gondor for Pelegir
  5. Harad vs Gondor for West Harondor
  6. Galadhrim vs Angmar Eagles Eyrie
Below the map shows the army moves at the beginning of round five.
Army moves in round 5

Wednesday, 27 August 2014

WotR SBG - Turn 5 Tact Points

All factions have now given their Tact points for round 5, they are listed below:


1. Mordor - 3 points to move up turn order
2. Gondor & Fiefdoms - 3 points to move up turn order
3. Isengard & Dunland - 3 points on militia
4. Rohan & Wanders in the Wild - 3 points to move down turn order
5. Moria & Goblin Town - 3 points on siege engines (militia)
6. Rivendel & Lindon - 3 points to move up turn order
7. Azogs Hunters, Gundbad & Angmar - 3 points to move down turn order
8. Easterlings & Khand - 3 points on militia
9. Harad and Umbar - 3 points to wall Pelegir
10. Lothlorien & Mirkwood  - 3 points on Militia
11. Durins Folk & Army of Thror - 3 points to move up turn order
12. Arnor & Shire  - 3 points on Militia

Therefore the new priority/turn orders :


1. Mordor
2. Gondor & Fiefdoms
3. Rivendel & Lindon
4. Durins Folk & Army of Thror
5. Isengard & Dunland
6. Moria & Goblin Town
7. Easterlings & Khand
8. Harad and Umbar
9.  Lothlorien & Mirkwood
10. Arnor & Shire
11. Rohan & Wanders in the Wild
12. Azogs Hunters, Gundbad & Angmar

And let battle commence!!!!

Monday, 25 August 2014

WotR SBG - Turn 4 Battle Results

At the end of round 4 the following battles were resolved - here are the results:

  1. Arnor vs Angmar (Arnor withdrew)
  2. Arnor vs Isengard (Isengard Withdrew)
  3. Angmar vs Gladhrim (Angmar withdrew)
  4. High Elves vs Moria (High Elves lost)
  5. Harad vs Gondor for Minas Tirith (Harad sacked Minas Tirith)
  6. Mordor & Harad vs Gondor (Gondor lost)
  7. Mordor vs Dwarves (Dwarves lost)
  8. Eastern Kingdoms vs Dwarves (Eastern Kingdoms lost)
  9. Eastern Kingdoms vs Dwarf non army (Dwarves lost)
Now on to ROUND 5!!!

Good:

Arnor & Shire
Rivendell & Grey Havens
Rohan & Wanders in Wild
Dwarves/Army of Thror
Gondor & Fiefdoms
Lothlorien & Mirkwood
1450
1400
1850
1550
1050
1250

Evil:

Mordor
Moria & Goblin Town
Azogs Hunters & Angmar
Harad and Umbar
Easterlings & Khand
Isengard & Dunland
2050
1850
1150
2050
1000
1100

Wednesday, 9 July 2014

WotR SBG - Turn Four moves

WotR SBG - Turn Four MOVES

At the end of round 4 the following battles need to be resolved:

  1. Arnor vs Angmar (in Angmar)
  2. Arnor vs Isengard (in Tharbad)
  3. Angmar vs Gladhrim (in Carrock)
  4. High Elves vs Moria (in Troll Shaw)
  5. Harad vs Gondor for Minas Tirith
  6. Mordor & Harad vs Gondor (in South Ithilien)
  7. Mordor vs Dwarves (inVale of Celduin)
  8. Eastern Kingdoms vs Dwarves (in North Dorwinion)
  9. Eastern Kingdoms vs Dwarf non army (in Northern Rhun)
Map at end of turn 4 movement


Below are the list of army moves and tactical points spent:

1.  Isengard & Dunland - move up turn order
  - Army 1 - North Dunlnad to Tharbad
  - Army 2 - staying in Isengard
2. Mordor - Militia 
  - Army 1  - Southern Rhovanion to Vale of Celduin
  - Army 2 - North ithilien to South Ithilien
3. Gondor & Fiefdoms - Militia 
  - Army 1 - Anfalas to Lamedon
  - Army 2 - attacked in southern ithilien
4. Rohan & Wanders in the Wild  - Militia 
  - Army 1 - Western Emyn Muir to Westement
  - Army 2 - Isen to gap of Rohan 
5. Moria & Goblin Town - Major Terrain inFords of Bruinen
  - Army 1 - Moria East to Dol Guldur.
  - Army 2 – Fords of Isen to Trollshaws.
6. Rivendel & Lindon - Major Terrain Troll Shaw
  - Army 1 - Evendim to Tower Hills.
  - Army 2 - remain in Troll shaw
7. Easterlings & Khand - scouting 
  - Army 1 - southern dorwiniom to north dorwiniom
  - Army 2 - Eastern Rhun to Northern Rhun
8. Harad and Umbar - Militia
  - Army 1 -  East Harondor moving to South Ithilien
  - Army 2 - Lossarnach to Minas Tirith
9. Lothlorien & Mirkwood - Militia
  - Army 1 - Rhosgobel to Gladden fields
  - Army 2 - Mirkwood to Carrock
10. Durins Folk & Army of Thror -scouting 
  - Army 1 - being attacked
  - Army 2 - being attacked
11. Arnor & Shire - militia
  - Army 1 - Arnor to Angmar
  - Army 2 - being attacked
12. Azogs Hunters, Gundbad & Angmar
  - Army 1 - being attacked
  - Army 2 - being attacked


List below are the moves for each of the armies in round 3:

Army orders 1:

1. Harad and Umbar
  • Pelegir to Lossarnoch (attacking city)